

WoodLab
CB-12X16-Blend
CB-12X16-Blend
Couldn't load pickup availability
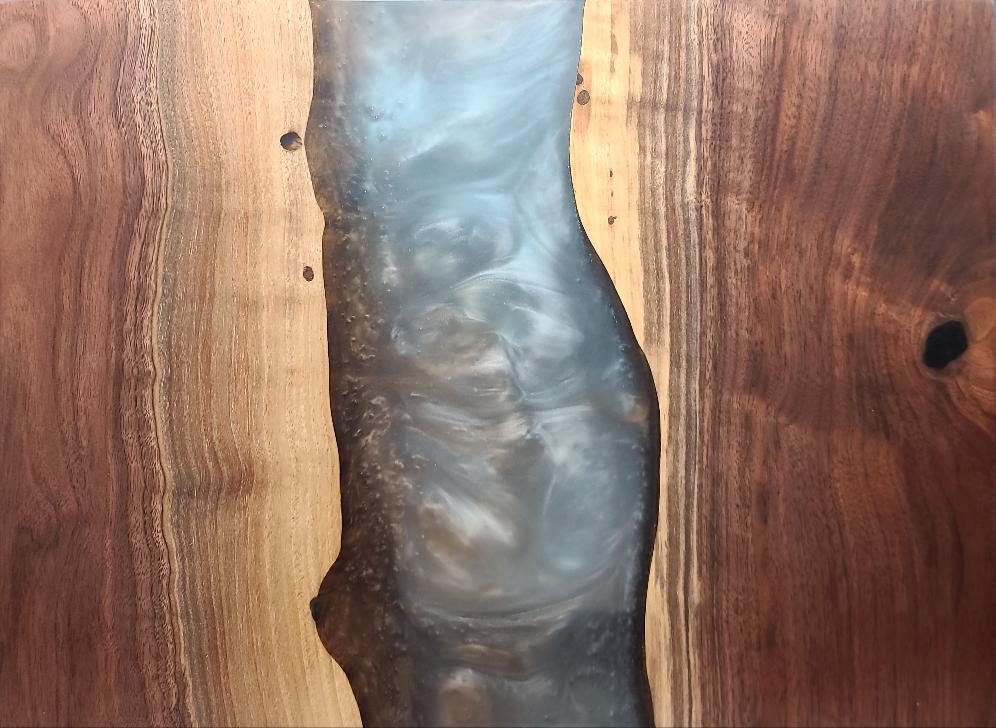
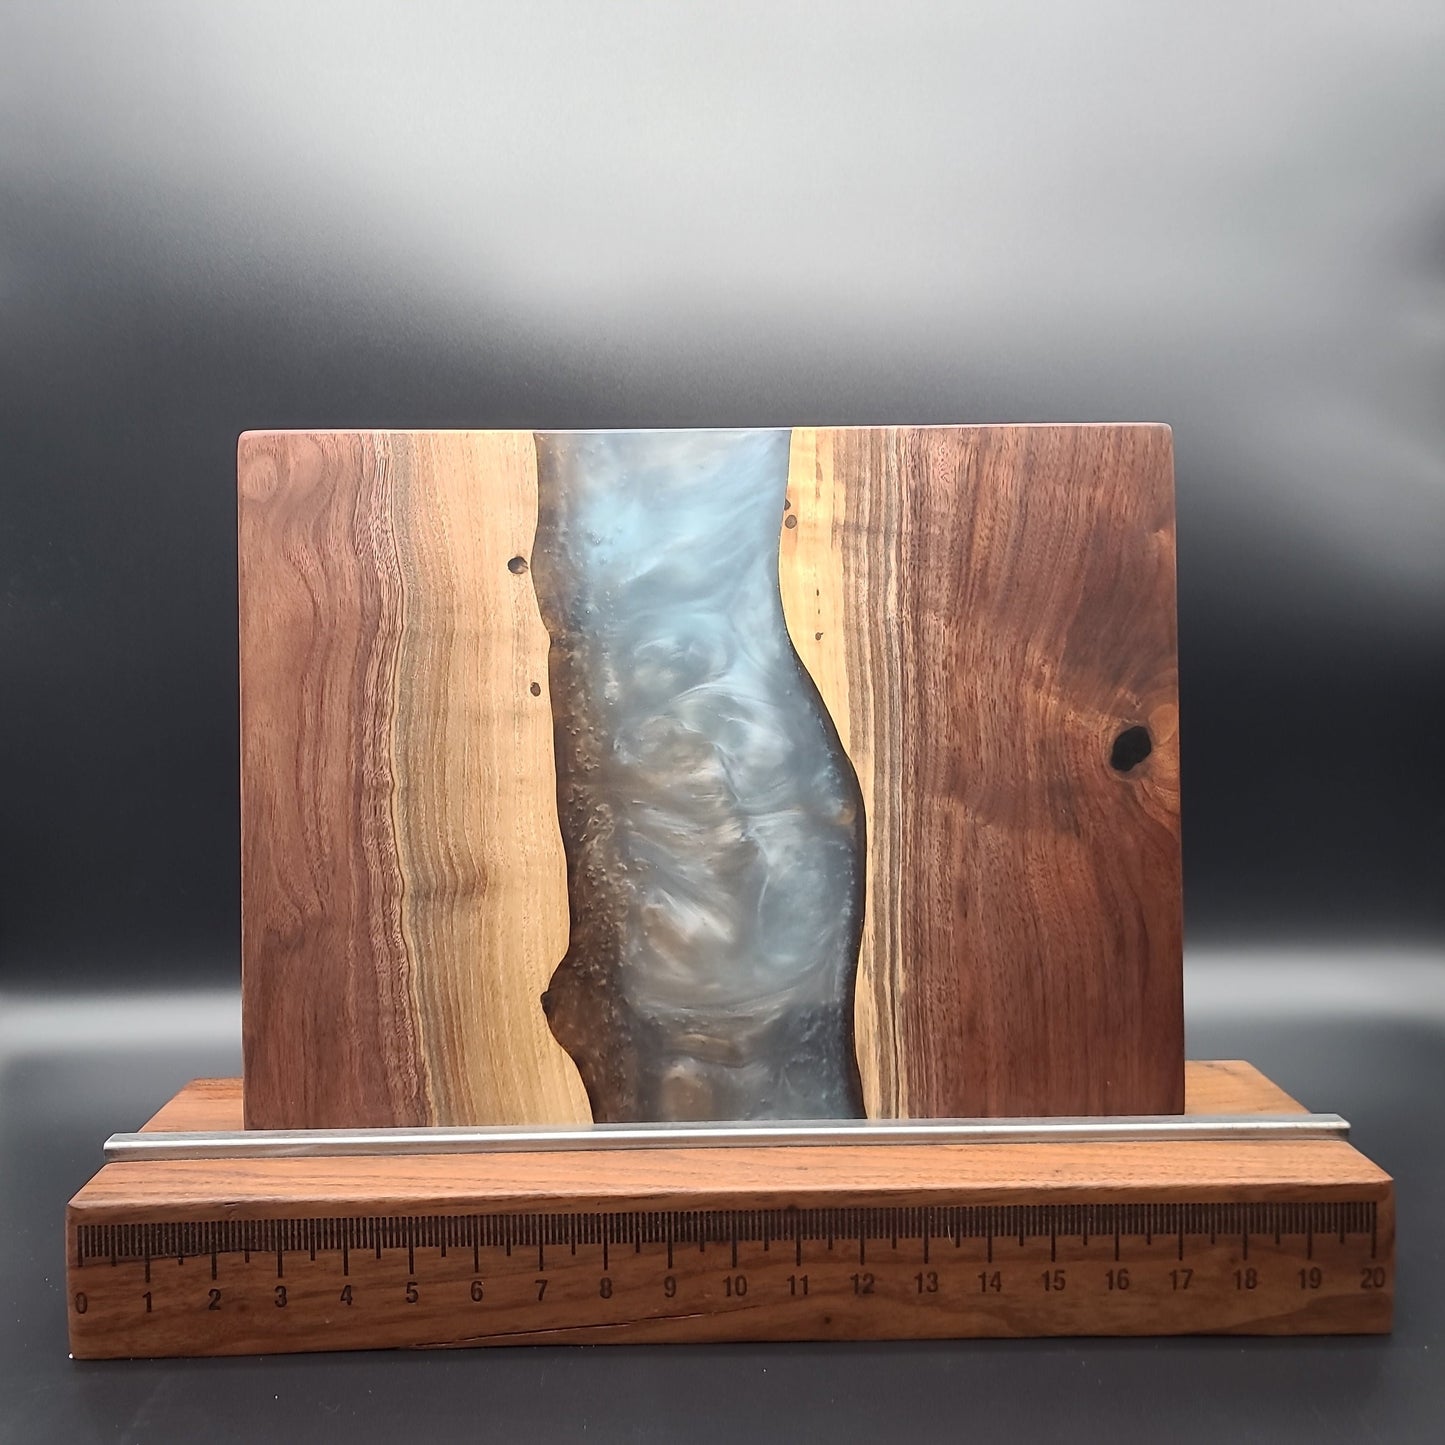
The board you will receive is a unique one-of-a-kind work of art. Once purchased this listing will be removed and there will never be another board like it!
How To Use
Charcuterie boards are your answer to stylish, multi-functional, sustainable serveware and food staging displays. We love using them as tapas, cheese and charcuterie serving boards, and then when not in use, perched against a backsplash, styled with a succulent or plant and adding functional history and artistry to our countertops.
About Our Materials
Each board is unique and as such, the grain pattern and coloration of the wood will vary from piece to piece.
The Wood
We source urban rescued wood, which means that the trees used were felled electively by homeowners and businesses due to space constraints or minor damage. We work with local mills and arborists to ensure the trees were sustainably salvaged right here in the Treasure Valley or in nearby Eastern Oregon. Once milled, the wood is air-dried for over a year and then kiln-dried for optimal moisture content and usability.
The Epoxy Resin
We fill voids using EcoPoxy™ FlowCast- the most eco-friendly epoxy resin on the market. It creates a seamless, integrated attachment to the wood, ensuring integrity and food safety.
The Finish
The protective coating is Odie's Oil, a food-safe and non-toxic hard wax that resists water, oils and acids. We include a mini-kit of Odie's and buffing pads to help care for your board.
Questions?
We love what we do and we would love to hear from you! Please send us your custom requests, process questions or other inquiries.
We hope that you enjoy your board as much as we enjoyed making it. If, for some reason, you aren’t satisfied, please message us right away so that we can help.
Caring For Your Board
The durable finish will resist stains, but when used as a food serving board, you will need to clean it carefully.
Briefly hand wash with warm soapy water and fully dry immediately with a soft cloth. Do not scrub with an abrasive or submerge in water. Store in an upright position and in a dry area.
Or, use a non-toxic wood cleaner like Osmo wood cleaner, Seventh Generation wood cleaner or other wood-safe cleaner + preserver. You can also rehydrate and touch up your board with a little of the Odie’s Oil that we provide in your care kit.
Using This As A Cutting Board
While you can use this as a cutting board, to preserve its beauty, we recommend using it as a serving board, but feel free to use it as a cutting board if you wish. If you decide to use it as a cutting board, it will develop knife marks as any wood board will. The resin is tougher on knives than wood, so be advised that your edges might dull faster if you cut on the resin often.
If you wish to diminish or remove the knife marks, you can sand the entire surface down or spot-sand with a fine grit sandpaper (such as 400 grit), and then refinish with Odie’s Oil to re-hydrate and protect the surface.
About WoodLab
From "tree to table," WoodLab handcrafts custom solid wood + resin furniture & home goods that are sustainable, local, eco-friendly and heirloom quality.
Each piece has a story - from the wood growing up strong in local urban properties, to our friend + family team, to the design process that optimizes the wood's character and the great care we put into crafting and finishing each piece.
We build with respect for historical craftsmanship and modern sustainable practices so that you can enjoy your Idaho made one-of-a-kind piece for a lifetime.
Thank you for supporting a local, sustainable-focused business!
Additional Information
Item Details
Manufacturer: WoodLab
Size:
Weight:
Applications:
Serial Number:
Care instructions
Refer to this article for more information.
You can maintain your product to increase its longevity and premiere look. Maintenance should be done only as needed, otherwise there is no interval of time before maintenance should be performed.
Maintaining your furniture over time. Using Osmo and white/grey application pads
Here is a list of steps to quickly repair the areas that need some touch-up:
- Maintenance of your table top is only required on an as needed basis. If there is nothing wrong with the surface and it looks good, then there is no required annual or other interval routine maintenance. It is just as needed.
- In any effected areas that seem discolored, wet, scratched etc., first start with the 400 grit grey sanding pad that is included (which can be purchased at any big box store) and lightly sand the areas that need it. If the areas do not quickly repair and even out, then consider using a 320 grit sand paper and orbital sander, which will remove more material more quickly. You can spot-sand the table surface, or the entire surface as needed.
- If you do use a lower grit to remove any effected areas, you will want to work back up through the grits. For example, fi you needed to go down to the 240 grit, you would want to go over top of that area with the 320 grit and then the 400 grit before you apply the finishing oil.
- Once you believe the area is sanded to your liking, wipe away any of the sawdust so the surface is now free of any material and ready to be oiled.
- Open the can of Osmo 3043 oil and stir thoroughly. Using the white Scotch-Britepad (cut a small 2" ×4" piece off the large pad), dip the pad into the Osmo and lightly coat the white pad. Using as little oil as possible is best.
- Gently and evenly, apply the Osmo oil using the white pad to the sanded areas on the table.
- Grab a blue paper shop towel and after about 5 minutes since the Osmo was applied, gently buff off the oil that has not absorbed into the wood. Make sure there are no streaks in the surface of the table from residual oil. That's it, you're done! The oil will take about 8 hours to dry.
If you have sanded the affected areas smoothly, the areas that have been repaired should literally have disappeared.
If you do not have one of our care kits for basic repair and maintenance you may order one HERE; or you may clean your product very lightly with distilled water.
Thank you for your purchase of a beautiful WoodLab custom piece of furniture!
Here is the video linked above:
Shipping
Our Process
The roots (pun intended) of an individual piece are born before the wood ever reaches our shop. While we have always preferred locally-sourced black walnut, we also deal with wood of many species from across the nation. Many are trees that are decades or centuries old, and their legacy continues when they are cut into slabs which we then use for our products and sell directly to customers.
Once the wood is milled into the illustrious slabs, it is considered "green" and has to be air-dried. Due to the semi-arid climate of southern Idaho, this typically takes about a year/inch, for example, a 3-inch thick slab would take 3 years to dry. During this process, the wood checks (cracks) as it is drying. It is crucial to properly dry wood so that it does not continue to crack or split once it has been made into a product.
After the wood is dry enough, it then goes through a process known as "kilning". The wood is placed in a wood kiln, an isolated chamber where the wood is exposed to extreme heat. This kills off any bugs, insects, or eggs that may be hidden within the wood. Kilned and non-kilned wood are always kept separate - if cross-contamination occurs, bugs could get into the clean wood!
Finally, the wood is ready to be used in the shop. The slabs are run through our 52" wide belt sander for flattening, then set aside until used for a project.
Once a slab is selected for use, the bark is removed as it's extremely difficult to work with. It is then laid out and designs are drawn an proposed for a layout. Some slabs are cut and the live edges become the outline of the river, but the design is always unique and wood can be oriented every which way to make the perfect piece come together.
Once the layout is approved, it is then molded up in our pour room. The pieces are laid on a table and clamped into place and/or weighed down to keep the design from shifting. Resin is comparable to water in it's pre-cure state, so every possible leak point and crack has to be sealed in order to prevent the resin from escaping!
We use a variety of materials to make this possible. The pour table surface is made of a thick sheet of High-density polyurethane (HDPE), which prevents the resin from absorbing into the table surface.
- HDPE is one of the few materials that epoxy cannot penetrate!
We use starbond, a fast-drying super glue, to keep our wood islands from floating in the resin river. We use silicone to seal the outer edges and seams. It takes silicone about a day to cure, so molding up a large piece can take 2 or more days. Despite all that prep, leaks are still common so we keep an eye on fresh molds.
When the table is ready, we then mix up our resin. The thick-pour epoxy we use is mixed in a ratio of 2 parts resin to 1 part hardener. We are able to pour around 2½" thick, so each mold can be done in a single pour. The epoxy is crystal clear, so we mix in metallic pigment flakes specifically engineered to suspend in the resin, giving it a sense of depth and unmistakably beautiful element. For solid colors, we use a liquid pigment instead.
We pour as much as the crest of the river will allow and let it cure. Typically, the resin infiltrates and absorbs into the wood, and we have to watch it, not only for leaks but to top it up as needed. Once we're confident, we let it be. With the amounts of epoxy we use, it takes about 3 days to cure.
While the resin absorbs into the wood while curing, that's not the only thing it does. There is a lot of science that happens completely unseen during this time. Bubbles are a common sight. This can come from places where there may be a hole in the wood, and the resin hardens as it fills that space, trapping bubbles in it. Static electricity is also a key contributor to bubbles, which comes from the HDPE plastics. We are innovating to reduce or eliminate the static issue entirely.
The curing is an exothermic chemical reaction and as such, the resin can get very hot during the process. This temperature usually is for the better- it creates updrafts and downdraft cycles within the epoxy itself, as it rises and cools, then sinks and heats again. This internal current takes the pigment with it, creating the breathtaking designs and swirls all on its own.
Once the resin is finally cured, we then remove the mold from the table. larger pieces can take 2 or 3 people to carry out of the pour room!
We remove excess bits of epoxy and silicone on the edges, then send the hardened piece through the wide-belt sander once more. The wood and resin thicknesses vary greatly, so the whole piece is flattened some until the surface is uniform.
Next, if there are any bubbles, holes or voids the resin didn't manage to fill, we use UVPoxy from ecopoxy, which cures much quicker (24h). This can take several hours just to fill each spot, depending on the depth and number of cavities. The spots are then sanded down with orbital sanders. The Wide-Belt only outputs a grit around 80, so the piece has to be sanded multiple times, each time with a higher grit level. Often, pieces are sanded 4 or 5 times until sanded with 320-grit sandpaper, at which point the surface is smooth enough to properly show the details in the wood.
Alongside this production queue, we outsource our legs from local welders. The designs are fabricated and painted as needed, then dropped off at our shop. We align the bolts so that they anchor in the wood and are not seen in the resin, then install the legs securely using as many bolts as will securely hold the table in place. Large or heavy pieces have additional reinforcement to keep the table from bowing, including rails or even a center leg.
The piece is still murky from the sanding, but once we oil it, it springs to life. We use osmo finishes which affect the final tone of the surface. We start with a water-resistant penetrating layer, then the finishing coat which can apply a matte, satin, or gloss look to the piece. Finally, we top the piece with a ceramic coating that provides superior durability while also making the details pop.
Each coat takes about 8 hours to dry, so the post-sanding process takes at least 2 days to perform.
With the final coat applied and cured, the piece is ready to go! Spec furniture stays in the showroom and is listed online, while custom projects are either delivered locally or shipped. We thank you for you business and include a care kit with every purchase.